Monday, December 8, 2008

Make a Home for Nature's Best Recyclers


Charles Darwin once wrote that all the good soil on earth has been eaten and excreted by worms at least once. After 25+ years of organic gardening and 12+ years of having a worm bin, I must say that I heartily agree!

Worms are one of nature's most amazing creatures, and most kids can really relate to these non-threatening, tickly wonders. And a worm bin is a great feature to have in a child-friendly garden. The red wiggler worms who inhabit it will turn your leftover fruit and vegetable scraps into the best compost ever seen. And it will require very little work on your part once it's set up and bedded, as the kids will want to do most of the feeding.

You can get a free design from Seattle Tilth for a 2ft x 4ft outdoor worm bin, that you can build with a sheet of plywood and some scrap lumber. Seattle Tilth also has a design for an indoor bin made from plastic Rubbermaid tubs. Check the "More Resources" blog entry for how to contact them.

I recommend using moistened, fallen leaves as the bedding material for outdoor bins, as they are the natural habitat for red wigglers. You can also purchase a "starter set" of red wiggler worms from Tilth or from the Yelm Worm Farm, which will soon begin filling your bin with their hungry little offspring. Check the "More Resources" blog entry for how to contact both sources.

Kids also like to search for worm cocoons and baby worms in the bin, so make sure your bin is easy to access for them, and that it has a safety hook or other device that prevents the lid from being able to shut unexpectedly.

More Resources for Children's Activities


The Complete Book of Birdhouse Construction by Scott D. Campbell
Landscaping for Wildlife in the Pacific Northwest by Russell Link

Seattle Audubon Society www.seattleaudubon.org

The National Wildlife Federation's Wildlife Habitat Program www.nwf.org/nwf/habitats

Seattle Tilth www.seattletilth.org

Yelm Worm Farm www.yelmworms.com

National Gardening Association Kid's Gardening website www.kidsgardening.com

Build a Nest Box


Many native birds nest in hollow trees, which are rare in our urban and suburban landscapes. A nest box that is built to just the right dimensions and installed in your garden is a very welcome sight to Chickadees and Wrens. These are two of the easiest-to-attract, cavity-nesting birds, and are very helpful to have living in your garden!

Children as young as 4-5 can help to build a nest box. Make sure to follow plans with the dimensions, entry hole size, and placement that Chickadees and Wrens prefer. This will make the nest box most attractive to them, and will help ensure that (non-native) English Sparrows, Starlings, and Squirrels are kept out. These creatures can prey upon the little nestlings and drive their parents away.

This is also the main reason that you should never put a perch on any birdhouse. Chickadees and Wrens are nimble birds that don't need a perch to get in and out of the nest box easily. A perch will allow predators easy access to the nestlings.

Check the "More Resources" blog entry on this site for the names of two great books that contain all the nesting box plans you will need. Both books are available in most local libraries.

Place the nest box on a 6-10ft tall post or galvanized metal pole, near or within the canopy of a tree. Placing it near a small, flexible branch will help the parents take a quick peek into the box before entering, and help the little nestlings get the courage to take their first flight. Keep the nest box away from any big branches that would make it easy for a squirrel or raccoon to jump on top and try to gnaw through.

To attract the Chickadees and Wrens right away, lay a little blanket of dried moss and/or small wood chips in the bottom of the completed box. It will be very exciting to observe the parents raise their young, and if you're lucky you will get to see the first flight of the little fledgings!

Another reward for your efforts is that a family of Chickadees or Wrens living in your garden will take a big bite out of your aphid problems each and every year!

Easy Birdbaths to Create


All birds need to bathe frequently and preen their feathers in order to keep them in the best condition for flying and insulation. And just like us, they need clean water to drink.

Children can help attract many native birds to your garden by creating simple and inexpensive birdbaths to place in safe locations.

Drill a few holes in the top edge of a large plastic plant saucer or other shallow pan, thread wire through the holes to create a hanger, then find a strong tree branch to hang it. Thread the top of the wire hanger through a section of old garden hose to prevent damage to the branch bark when the birdbath moves with the wind.

If you have an old tree stump around, move it to within 10 ft of a large shrub or tree so that birds will have a safe place to fly to if a predator comes. Then place a large shallow pan or saucer on top of it for an instant pedestal birdbath. Use a large flat rock in the center to hold the pan down and give small birds a place to perch and wade in.

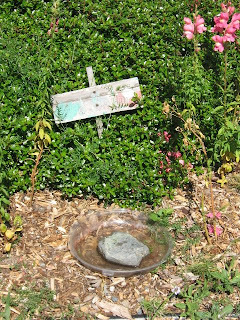
You can place a large saucer directly on the ground within a quick hop to safe shrubbery, as long as you do not have outdoor cats or dogs patrolling your garden. The birdbath pictured above is in the Magnuson Park Children's Garden, where this is not an issue and birds can quickly jump into the nearby Escallonia bushes if needed.

No matter what kind of birdbath you create or buy, it's important to remember to give it a quick scrub every few days and fill with clean water, especially in hot weather. Providing a source of clean water in a safe location will guarantee increased bird activity in your garden!

Invite Butterflies to Your Garden


Believe it or not, butterflies like to drink minerals and water from mud puddles! And it's easy for children to create a "puddling pond" custom-made for these winged wonders.

First, choose one of the sunniest spots in your garden for your puddling pond. Butterflies need the warmth of the sun to keep their wings in good flying condition.

If there are cats or dogs patrolling your garden
, make sure the "pond" is off the ground. Place a large plant saucer on an old tree stump or drill holes in the edge and hang from a strong tree limb. Then fill it with garden soil and add water until it is the consistency of a mud puddle.

If cats or dogs do not patrol your garden, you can simply dig a wide, shallow hole, and place a large plant saucer inside or line with a heavy piece of plastic. Fill it with the soil that was dug from the hole, and add water. Voila- instant mud puddle!

Place a few large rocks around the edge of the saucer or hole for butterflies to rest on while warming their wings. Add more water as needed, especially during the hottest days of summer.

A handmade sign lets inquisitive human visitors know why you have a year-round mud puddle in your garden!

Plant a Shoe


Worn out kids' shoes can have new life as miniature planters.

Good drainage is essential to a thriving shoe garden. First drill 1/4-inch holes throughout the soles, then fill the shoes with a potting soil mixture that has lots of perlite in it. (perlite looks like tiny, bumpy white rocks)

Tuck in low-growing sedums for shoe gardens that will "dance" in a sunny spot. There are scores to choose from, and your child will enjoy a trip to the plant nursery to pick their special favorite.

Or, for a shoe garden that will "hide" in the shade, plant with moss. Your child can easily remove moss from a shady sidewalk or retaining wall, or from another part of your garden, to lay inside the shoe like a little blanket.

Paint a Rock


Use garden rocks and leftover house paint or other acrylics to create ladybugs, watermelon, tomatoes, or any other creatures your child would like to have in the garden.

Choose smooth rocks that are at least 2 inches in diameter, wash with plain water, then let dry before painting. An old, adult-size t-shirt will work great as a painting smock.

When the painting is completed, let the rocks dry for a day or two before placing them out in the garden. They can be used to line pathways, border a special bed, or just "dance" around the garden!